
Zoom F6 Audio Interface
We’ll show you step by step how to use the Zoom F6 as an Audio Interface

Zoom F6 Audio Interface For Mac Audition and Ableton
In this blog post and video tutorial, I will walk you through the steps of setting up your Zoom F6 with a MacBook in Adobe Audition and Ableton Live.
How to set your Zoom F6
If you do it the first time, it can be quite difficult to find the correct settings.
Selecting the audio interface on the Zoom F6
turn on the Zoom F6
click the menu button (left corner)
scroll down and click on System
select USB
select Audio Interface
select and click multi-track (PC/Mac)
You’ll see several options to use the Zoom F6 as an audio interface. If you like to use the setting “Audio Interface with Rec” make sure you select the correct output parameters for the headphones to USB.
Settings for headphones for Audio Interface with Rec
go back to the main menu settings
select Output
click on Headphone out
select Routing
In order to see the USB selection, you have to have Audio Interface with Recording activated. If not, you will not see the USB selections.
Connecting Zoom F6 with Mac


I use the Zoom F6 audio interface in multi-track mode. But before I can connect the F6 to Audition or Ableton on my Mac, I need to use a USB-C cable (which comes with the charger for newer Mac Book Models) and make sure that it's active in the Audio MIDI Setup.
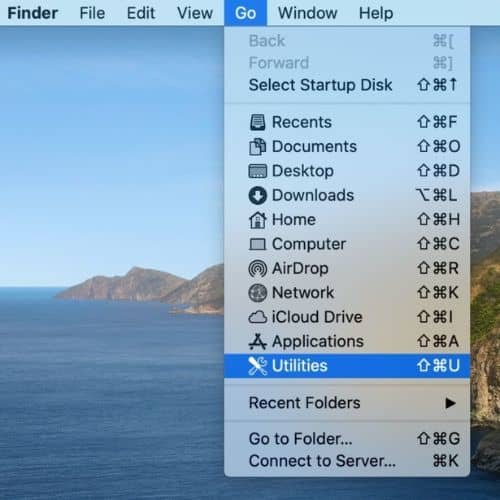
In order to find out go to the main page of your Mac book
click on Go in the main menu bar
select Utilities
click on Audio MIDI Setup
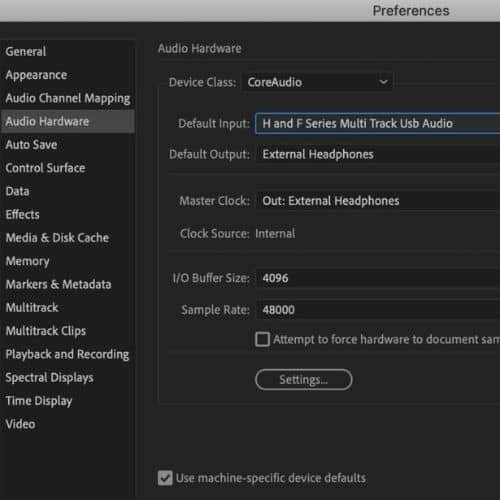
If you have the F6 in multi-track activated it will appear on the left side as “H and F Series Multi-Track Audio”.
Now you have successfully connected your F6 with your Mac.
Connecting Zoom F6 & Adobe Audition


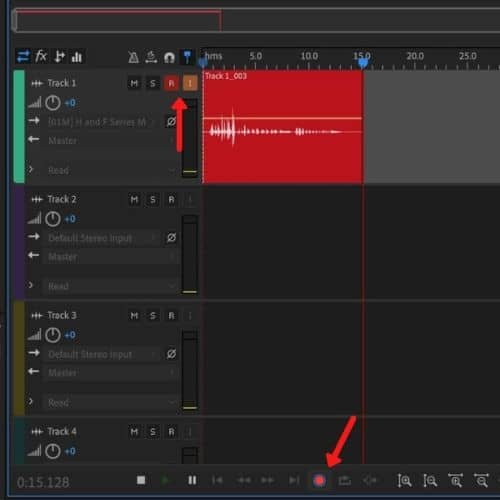
If you use one microphone for each track, change the default stereo input to mono. The Zoom F6 has 6 tracks and you can select each individual track. That way when your microphone is connected to channel 1, you can select H and F Series Multi-Track USB Audio in 1.
Now you should be able to see the mono level moving up and down but if you're wondering why you can't hear anything out of the headphones then let me tell you, I was in the same situation before.
In each track you see M, S, R & I. To record and hear at the same time you need to select R & I.
Once you hear yourself now, you have successfully connected the F6 with Adobe Audition! To record audio, hit the red button at the bottom of the multi-track session.
Connecting Zoom F6 & Ableton 10 Live


I'm a new Ableton user and in my humble opinion, it is incredible what you can do these days with sounds. I haven't even scratched the surface yet but learn every day a little bit more!
To connect using Ableton
Select Live in the upper left corner
Click on Preferences
Choose Audio and check the parameters for Audio Input Device & Audio Output Device
If your Zoom F6 is in multi-track mode change the option for input to "H and F Series Multi-Track USB Audio (6 In/4 Out)"
If you use external headphones, change output to your external headphones or to any speaker you're using.
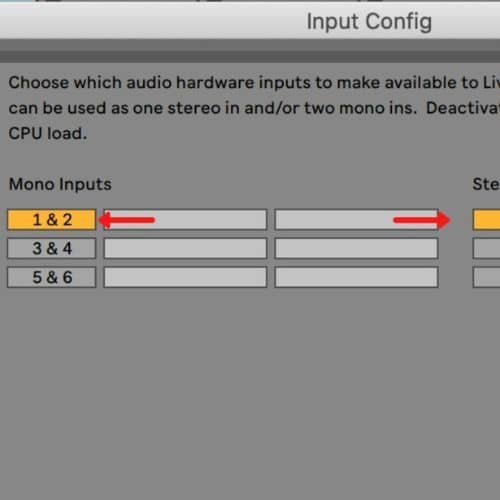
Next, we have to select the tracks in the channel configuration area under Audio Input Device.
In the Channel Configuration line select Input Configuration
Depending on where you have the microphone plugged on your Zoom F6 you need to select the correct track.
In my case, I have the mono and stereo input 1&2 selected. Hit "Ok" before closing the window.
Now, go back to the main window of Ableton and you will already see the green level moving on one of the routing audio tracks. In order to record and listen to your own voice just click on In.
If you can hear yourself now, you have successfully connected the Zoom F6 as an interface in Ableton Live.
To record your voice or instrument, just click on the record button on the right side of the track & hit the main record button in the top menu.
I hope this blog post was helpful and that you're able to have fun recording your first live session!